Quick Start
Information in this document contains excerpts from the comprehensive DKAN manual available at https://dkan.readthedocs.io/en/latest/
DKAN
The SPREP Inform project adopted the DKAN Open Source Data Platform to implement and build the Inform network of data repositories. These repositories are intended to manage and share national, regional and global environmental information for informed decision making.
"DKAN is a open data platform with a full suite of cataloging, publishing and visualization features that allows governments, nonprofits and universities to easily publish data to the public. DKAN is maintained by CivicActions.
DKAN is a Drupal-based open data portal based on CKAN, the first widely adopted open source open data portal software. CKAN stands for Comprehensive Knowledge Archive Network. It has inspired at least one other variant - JKAN, which is built on Jekyll."
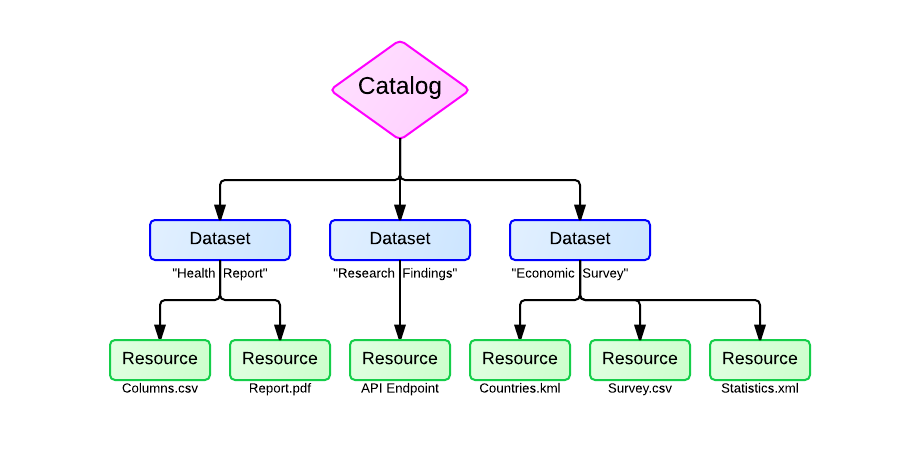
What is a dataset?
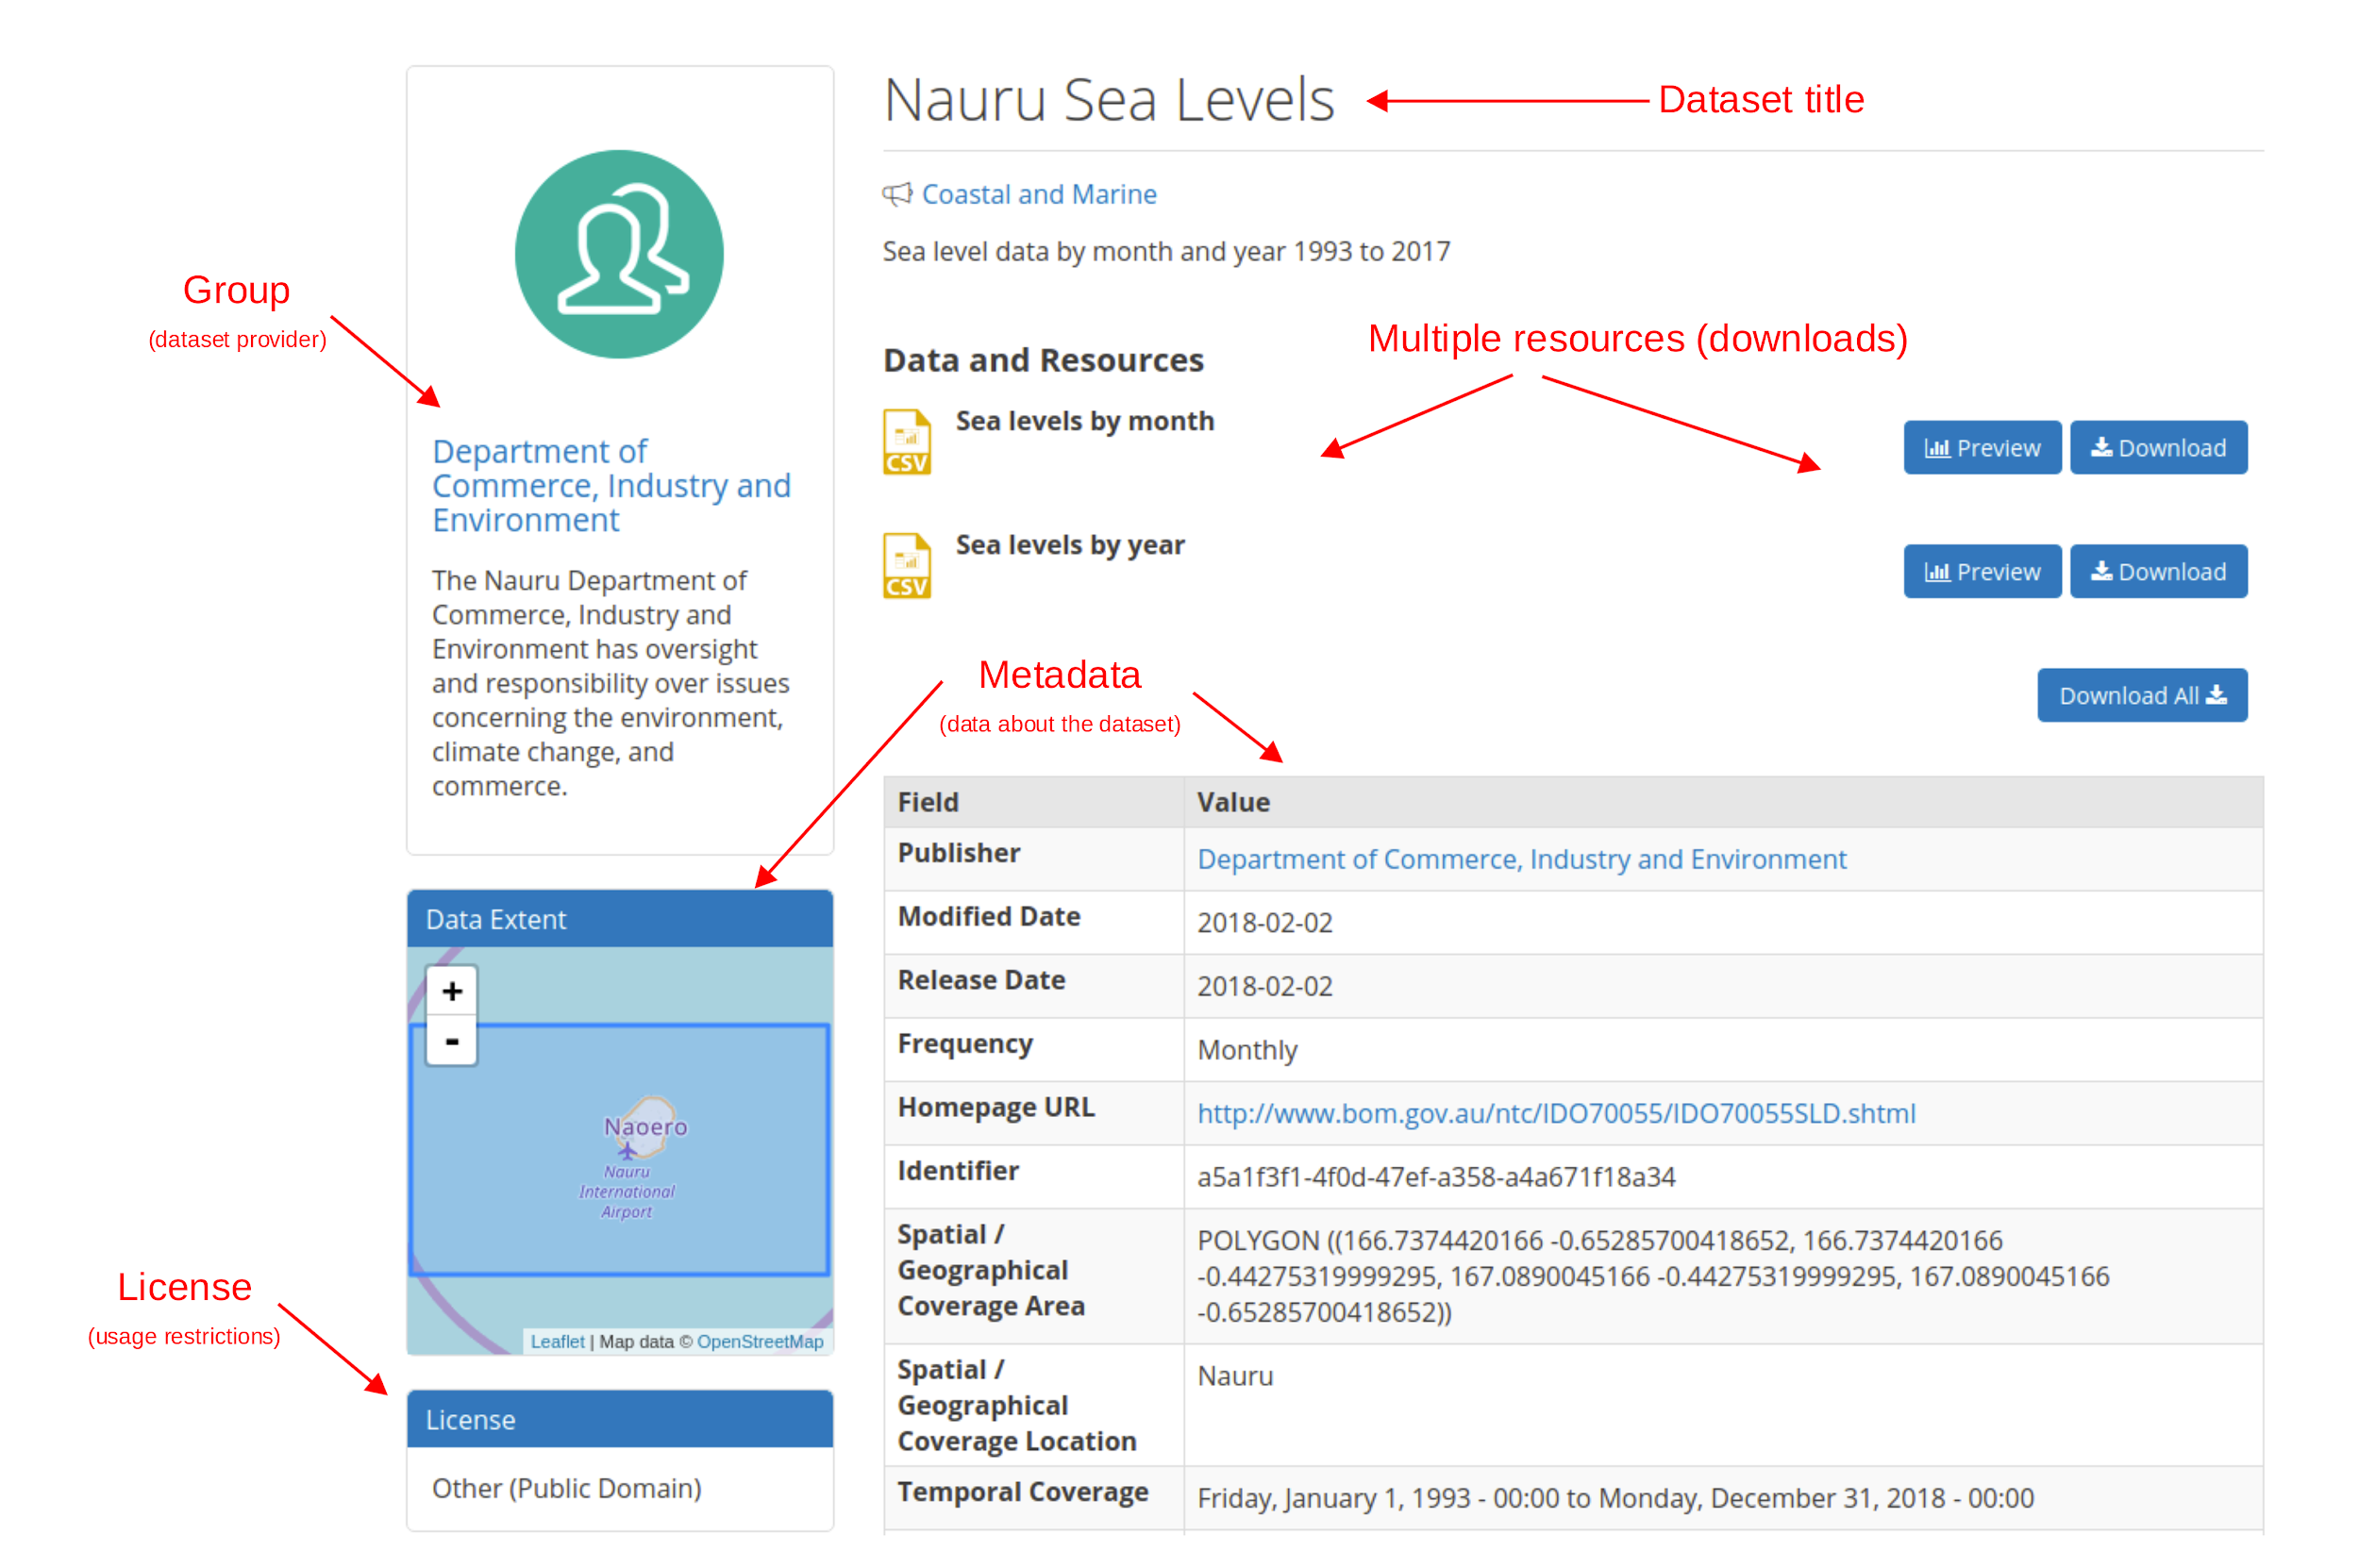
Datasets are containers that hold resources. They can hold metadata such as author, license type etc, and can be assigned to Groups. One dataset record may contain multiple resource records, which are used to provide multiple file formats, data variations or related information such as reports.
Create a dataset
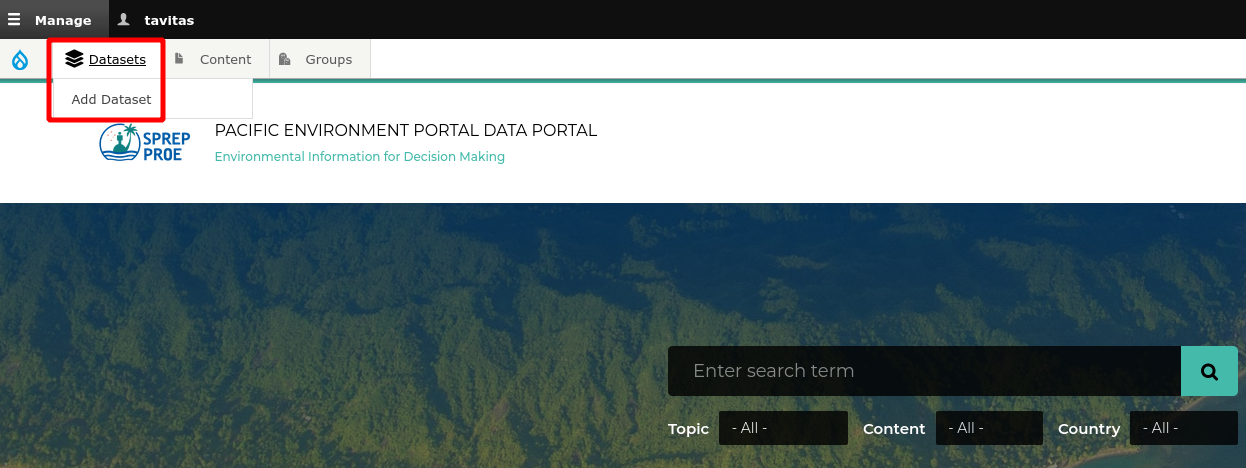
From the Admin Menu, hover over the Datasets link. On the drop-down menu, select the Add Dataset option.
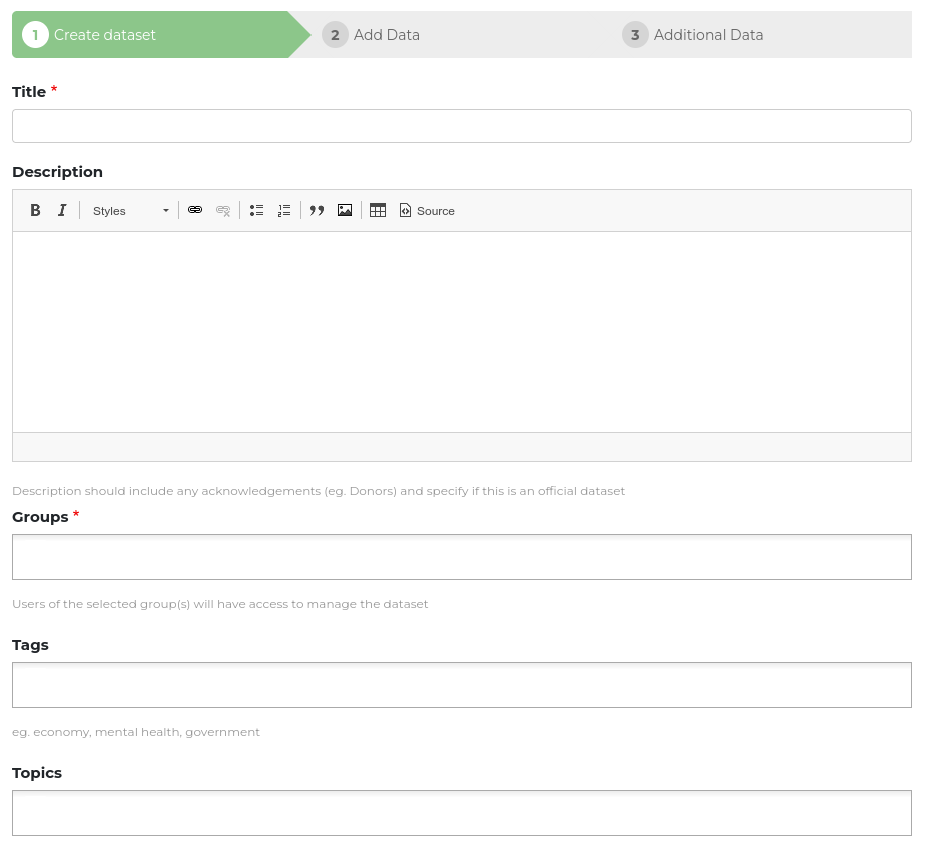
1. Add Basic Metadata
Add values for the basic metadata fields such as title, description, groups, tags, relevant countries and topics. Specify the license as Public, Shared or Private. Fields with a red asterisk are mandatory. Click NEXT: ADD DATA to continue
2. Add a Resource
Resources are the actual files or references for the dataset being published. Multiple resources can be added to one dataset, which can be useful for publishing multiple formats or variations of the dataset. Resources can also be used to publish other related references such as a copy of a report that a dataset was used for.
There are three methods for adding a resource file:
Upload
Drag and drop a file into the upload area or select Browse to choose the file to upload.
Embed Resource
Provide a URL to a file provided on an external website and the data portal will attempt to embed and display that resource directly on the page. This is useful when referencing external images so that they are visible on the resource page directly in the data portal. Note however that some website block their resources from being embedded..
Link to Remote File
Provide URL link to resource provided by an external website. The link will be published as a standard hyperlink.
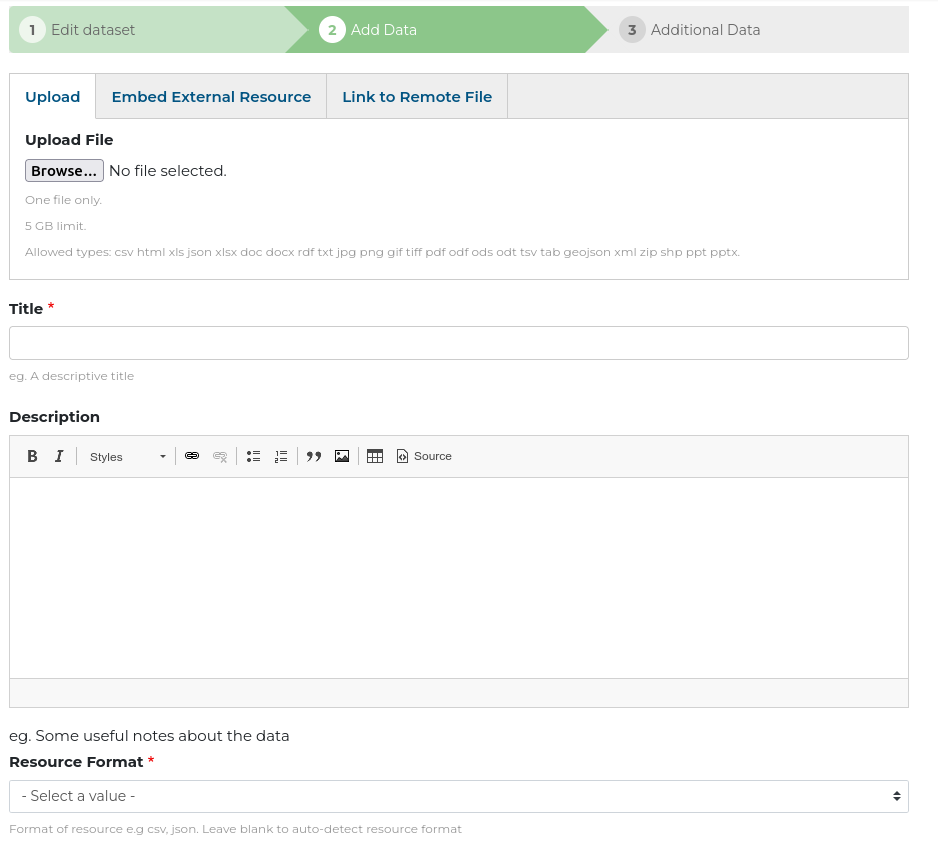
Provide a title and description for the dataset. If providing multiple resources for one dataset, it is a good idea to include in the title how the resources are different. E.g.
- ‘Rainfall data - Monthly’
- ‘Rainfall data - Yearly’
After completing the fields or a resource, select SAVE to upload the resource and view the resource page. You can also click on the NEXT: ADDITIONAL INFO button to continue to step 3 where more metadata can be provided.
3. Additional Metadata
This step allows for more metadata (information about the dataset) to be added for a dataset. If the information is available it is a good idea to add plenty of metadata. All the metadata fields help users find datasets and determine if a dataset is useful to them.
The additional metadata fields can be populated by clicking Next: Additional Info after creating a resource record, or by selecting Edit from a dataset page.
Additional metadata fields:
Author - The author of the dataset.
Spatial / Geographical Coverage Area - The area that the dataset relates to. Drop a pin or draw a polygon on the map to specify the area
Spatial / Geographical Coverage Location - The name of the area that the dataset relates to.
Frequency - How often a dataset is published.
Temporal Coverage - The start and end date range encompassing the dataset.
Contact Name - The name of the person who can be contacted regarding the dataset.
Contact Email - The email address of the person who can be contacted regarding the dataset.
Homepage URL - The URL of the homepage where more information about the dataset can be found.
Data Standard - The name of the data standard (if any) that the dataset conforms to.
Language - The language used in the dataset.
Related Content - Any other web resources related to the dataset.
CSV Files
The format of your data makes a big difference to how it can be viewed and used.
Some data formats are machine-readable, allowing the data portal to process the files, so they are easier to find and can be published as graphs and charts.
You can make your data machine-readable by uploading it in the CSV format. Formatting data as CSV
Most data-crunching software like Microsoft Excel allows you to simply go to File >> Save As and choose the CSV format.
Each CSV file is like a single sheet in a spreadsheet document, so you may need more than one CSV file to hold all your data.
Checklist
If you have many 'tables' of data on one sheet, copy each table to its own spreadsheet page and export each sheet as a CSV. That will be a better format for your spreadsheet too.
In a CSV file, each record must be contained on a single row or column.
Ensure there are clear and succinct headings for all the data. You can have headings for the columns and for rows, using the first cell at the top of left in each. It is not necessary to have both sets of headings, but it is usually necessary to have one.
Merged cells are not possible in CSV:
Flatten your headings into a single cells in which each cell fully describes the content of that column or row.
Split any merged cells in your data, otherwise the rows will not line up properly.
If one record spans more than one row, you will need to flatten out the values into columns of a single row.
If the data contains dates and times or specific units, ensure they are presented consistently. Provide another CSV (data dictionary) which describes the type of data present, its specific formatting and meaning.
Formulas should be rendered out to their calculated values.
It is good to include your spreadsheet or database files as additional resources for others who may want to manipulate the data in that format.
Making CSV files from relational data is a bit more nuanced. You can export results from a query or report as a CSV. Focus on creating a few CSV files which highlight the important aspects of your data.